Category Archives: Tips and Tricks

Free Custom Domain Email accounts setup with Google Domains

Free Business Email accounts setup on Google Domains
Without Google Apps / G Suite Subscription
Using Google Domains to get Free Email on your own domain (2018)

Gone are the days, when Google Apps for Work / Business (now known as G Suite) offered FREE services and you could setup your domain emails to work with Google.
But there is a work-around and you can still get Google to use your own domain to create free email accounts which will work just as smooth as Gmail does.

Please follow the instructions below to setup your own domain on Google to get Free Business Email Accounts.

Step 1.

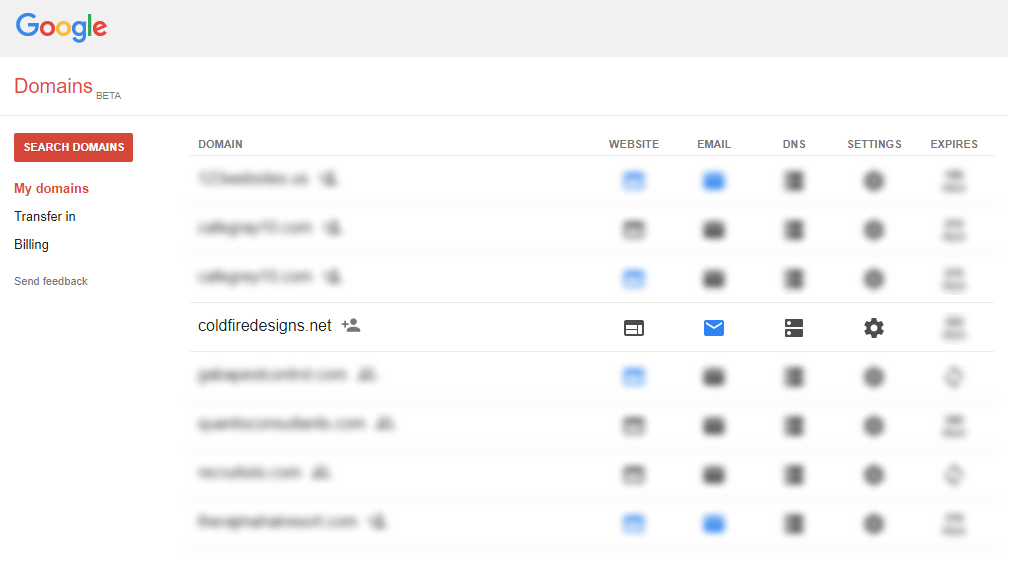
Buy or Register your domain from Google Domains. (Required)
Google Domains URL https://domains.google/

If you have registered your domain name from any other domain registrar, you will need to
Transfer your domain to Google Domains. For transfering your domain to google, please follow this https://support.google.com/domains/answer/3251236

Step 2.

Create Forwarding Email Addresses for your domain
Google Domains give you up to 100 forwarding email accounts which you can create for your domain name once you have your domain setup on Google Domains.
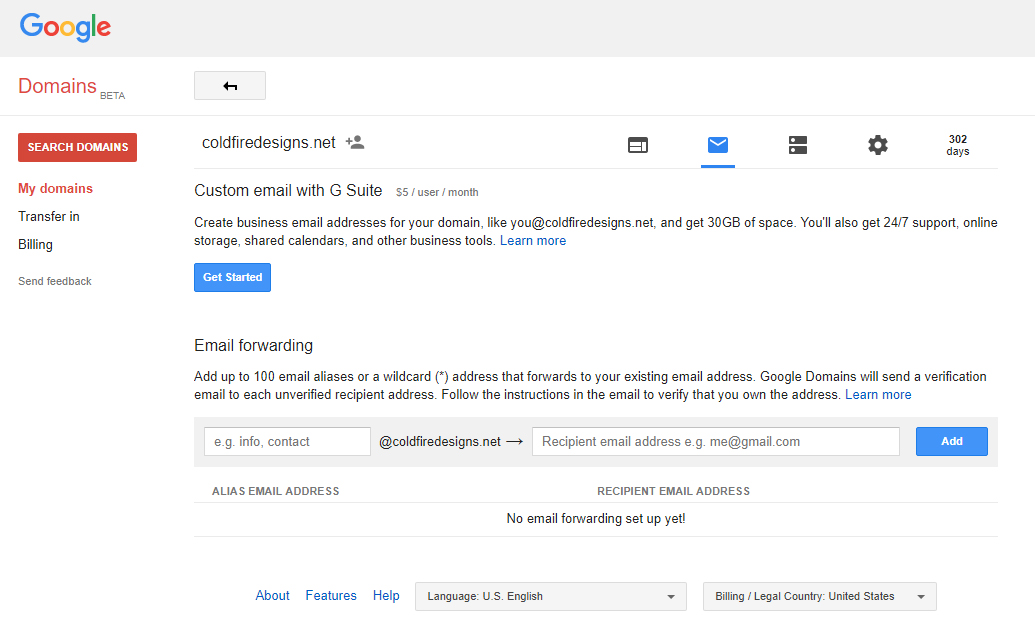
For example:
You registered mydomain.com
You can create [email protected], [email protected] , etc. up to 100 email addresses.

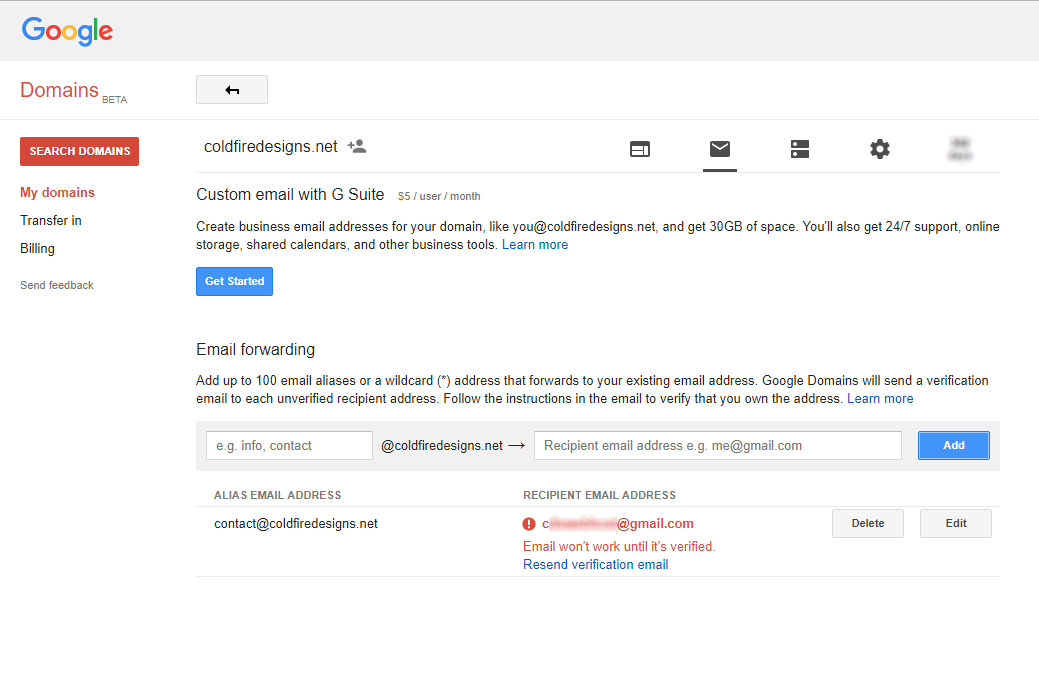
Please note that these are not actual email accounts, these are just forwarding email addresses which will let you create your custom domain emails and are redirected to your existing Gmail account.

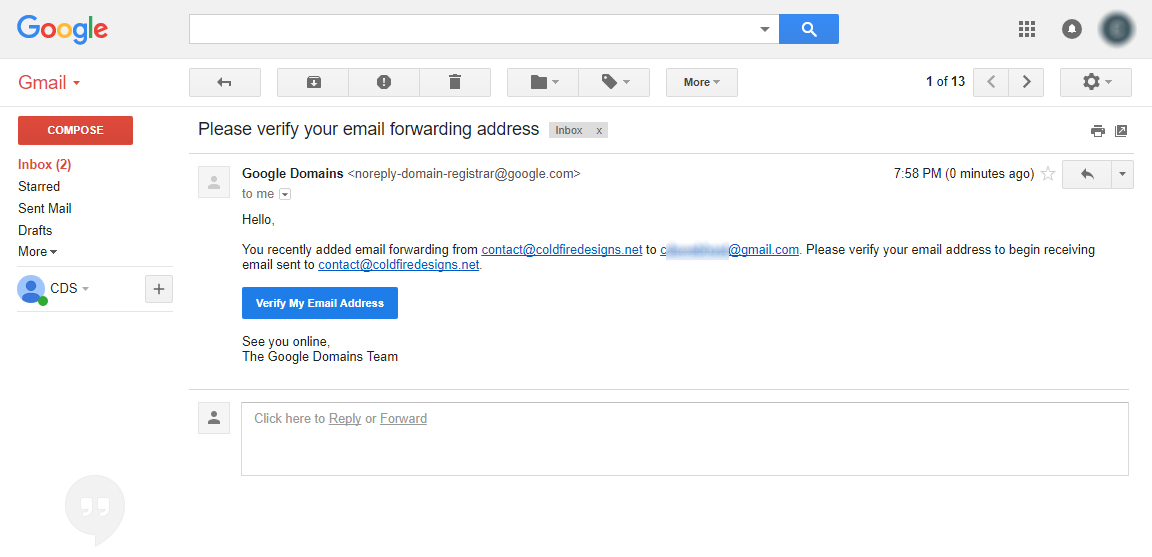
You will need to verify the forwarded email account by signing in your existing Gmail account and follow the instruction in the email received.

For detailed info on how to create forwarding email accounts, please see this link
https://support.google.com/domains/answer/3251241

Step 3.

Using your custom domain email accounts to send emails.
You have now verified your newly created forwarding email account from Google Domains.
But you know that forwarding email is only one way that is you can only receive emails on this new email account like [email protected] but cannot send any emails from this email address. So, here’s the work-around.

Go to your existing Gmail Account’s Settings (the one which you are forwarding to)

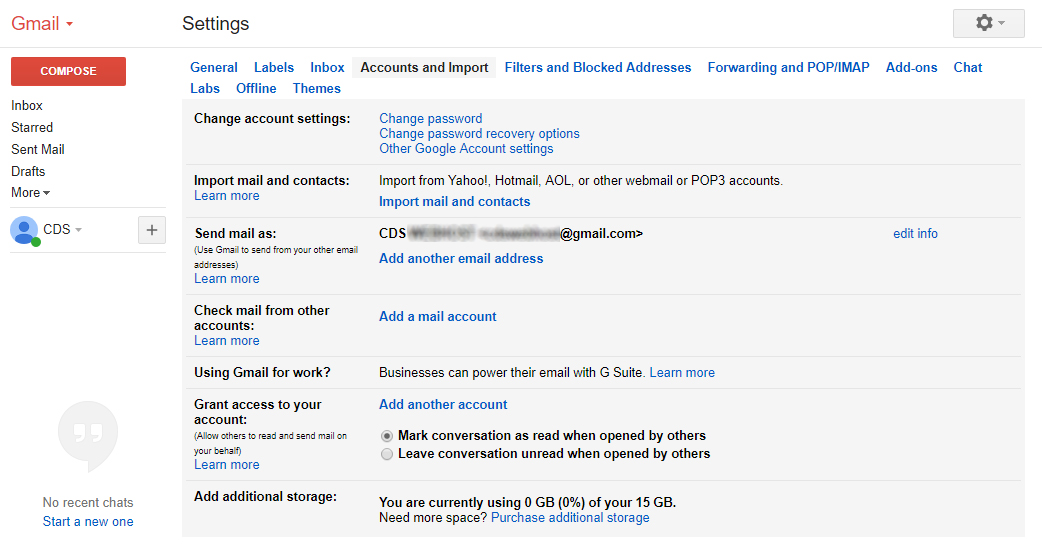
Accounts & Imports > Send mail as > Add another email address

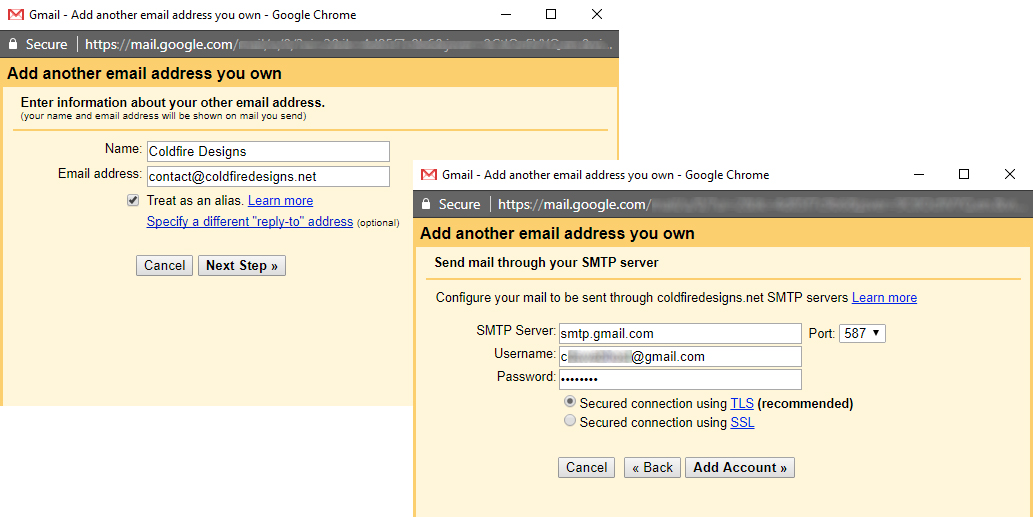
Use Gmail’s SMTP Config as shown in the screenshot above.
SMTP Server: smtp.gmail.com
Username: [email protected] (Your Gmail account with @gmail.com)
Password: Your Gmail account password (Feel secure – you are already on Google)
Secured connection using TLS (Try SSL if doesn’t work for you)
Port: 465 (This is the outgoing port for SMTP)

While signing in, your login attempt might be blocked and
You may need to:
Enable Less Secure Apps https://myaccount.google.com/lesssecureapps
If enabling the less secure apps option doesnt work for you, Generate App Password for your Google Account https://security.google.com/settings/security/apppasswords
This option is available only when 2 Step Verification is enabled for your account
For detailed usage of App Password https://support.google.com/accounts/answer/185833

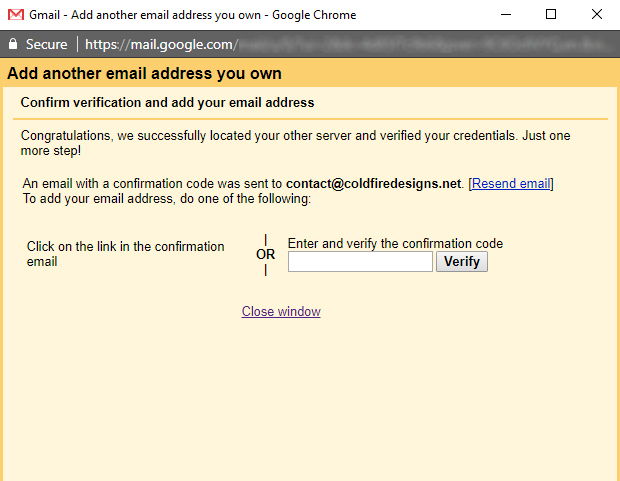
Once, you are signed in / connected, a verification code will be sent to your new account (which is forwarding to your existing Gmail account), so check your inbox and verify with the code.

That’s it. You can now send emails with the new business email address [email protected]
Hurray!

PRO TIP

You can create new Gmail accounts like
[email protected] and forward your email for [email protected] to this account.
Under the new Gmail account [email protected] set your forwarded email address “[email protected]” as default sending email account.

Now, you can send and receive emails at [email protected] without any hassle.
Bravo Google! Bravo Gmail!

If this article is not perfectly understandable, read on Google https://support.google.com/domains/answer/3251241

Download a PDF version of this article

Thank you for visiting our blog and we hope this will help you.
Blog Team
Coldfire Design Studio

Advertising Needs Common Sense

Advertising-Common-Sense

Common-Sense-Advertising-Marketing

Yes, you heard it right. Even before using your technical knowledge about any Advertising Platform or Social Media and its advertising tools, one needs to use his Common Sense. This article may surely help you if you are planning to start a new advertising campaign online. Below, I am sharing my thoughts on how and why Common Sense can help you in Advertising and hence produce greater Results.

1. Common Sense on choosing your right target audience.
It may not be as simple as you think. Too much study and thinking may bring you at a halt. So, be calm and serene when you want to start advertising. First step is to choose the right audience.

2. Common Sense to choose the right platform where your target audience is.
Now, you have chosen your right audience. Next, use your common sense where is your audience whom you want to advertise to. Think beyond the web. Your common sense will guide you.

3. Common Sense to think the way they think – what interests them.
It is not very common that everybody uses their common sense. Well said “Common Sense is not so Common”. If you know your target audience and where you can find them, use your common sense to think like them. Everybody who is looking to buy for a new gadget is not always looking for it. He has other interests too, take a guess what are those other activities which interests them. There you’ll find your clues. Use the clues to relate them to their behavior and interests which will help you a lot.

4. Common Sense to promote in the right way.
The right way to reach out to your target audience is very important. The platform you chose, will it offer you the flexibility to promote your product or service in your desired way? If it does not then it means that you are not on the correct platform. That is common-sense.

5. Common Sense to deliver your message in the right way.
You chose our target audience, platform and the right way. And now, you need to make sure that that your advertisement delivers the message in the right way. This means that you use your common sense to create the advertisement in such a wonderful way that your message is clear to them, interests them and generates a need.

6. Common Sense about promoting the products you sell or services you provide.
Till you are a big hit in the market already, its only ‘you’ who knows the best about your products or services. Tell people what makes it unique. As the competition is very high now a days, there might be thousands of similar businesses as yours but you have to use your common sense to think in a way which makes you unique and stand above your competitors.

7. Common Sense to expand, see your target audience behavior.
Yes, even after everything is done well, you need to see how your target audience reacts. You might get hundreds of inquiries in a day but only few sales. Why? Use your common sense to figure out what might be wrong which is not converting them into sales. Never forget that sales are unpredictable but your common sense will really help you get closer.

8. Common Sense to reach beyond your target audience & turn them into your clients.
All successful businesses want to expand and many does. Where are they getting new clients from? They do not have any kind of machines which generates new people for them who want to purchase their services or products. But yes, they do think differently and take the right approach to generate the need beyond their audiences. It is common sense that if a person buys a product, his friends or family may also be interested in it. So, plan how to reach out to them.

9. Common Sense to decide how much you need to spend on advertising and is it worth?
You created a huge budget campaign. But is it really worth spending so much on it. It is not always required to let the experts handle your advertising solely. Don’t go by the words of your Ad Agency, because you have to use your common sense to figure out that whether is it giving you the required output and are your happy with your return on investment. If it doesnt, change the campaign or may be the platform even.

10. Common Sense to always think that everybody is not online always.
Yes, everybody is not online always. Many of them could be your potential clients. Think how can you reach out to them. Just an example: you cannot advertise to a person via a notification who doesn’t even have your mobile app installed. Use your common sense to think of different ways and platforms.

We would love to hear from you about your thoughts on this article. Please share freely.

Windows Live Domains Migration

windows-live-mail-alternatives

I am writing this post for all those users who were using Windows Live Domains for their Business Emails and are currently facing problems due to their shut down (upgrade to Office 365).
Your business emails are configured on Microsoft Outlook formerly known as Hotmail.
The emails were made on Window Live Domains portal where one could use their own domain and create emails to make email accounts for your domain.

Last year, Microsoft closed the Windows Live Domains portal and migrated all the accounts to Office 365.
Now, all those users who have been using Windows Live Domain and created their business emails using it, they can continue using the emails without any problem. But now, they cannot sign in to the Admin Console, therefore, they cannot create any additional email accounts or even delete the already created ones.
Instead, they shall ask you to upgrade your account to Office 365.
Pricing: here

What is the solution now?
Solution No.1
You can stop using Outlook Emails and shift to some other third party business email providers like Google Apps for Business (recommended if you are willing to spend a little)
Google Apps for Business Pricing: here

Solution No.2
You can ask your website hosting provider to host the emails on the web server itself.
Cost: none (mostly all the website hosting providers give free business emails to configure)

Please note that you’ll lose all your data related to the emails when we’ll be shifting your emails to your web server.
To keep a backup, you can configure the old emails in Outlook Email Client and let it download.
Once, you can see all your emails downloaded, you can begin with the migration process.

In case, you are not able to back up your local computer, you will still be able to access your old emails on outlook.com as you did earlier but the only difference would be that the incoming and outgoing emails would not work.

Outlook.com for your Domain closes free signup

So finally, Microsoft has also made the Free Signup for Custom domains on http://domains.live.com/ paid.

This is what they have on their webpage now (screenshot below):

The most important thing to worry is their following statement:

We will continue to support the ability to log in to Outlook.com with your existing custom domain email address, but in the future, you will no longer be able to add or remove accounts in your domain.

Anyhow, their pricing can be read here but they haven’t informed anything about the migration of the old email account to Office 365 yet.

The most used 3rd party email provider for your domains / business emails was Google apps for Business (http://google.com/a), then Outlook.com (http://domains.live.com). Also zoho mail was providing email setup for your domain for free, but sadly it is also paid now.

So, what are the options left for people who do not wish to use their boring web server’s email? Please give your suggestions or post comments below.

Update added on July 07, 2014
Microsoft has finally announced the Migration Guide http://windows.microsoft.com/en-us/outlook/migrate-custom-domain

SMTP/POP Settings for Email setup on domains.live.com for your domain

After your domain is setup on domains.live.com, please use the following settings to setup your email account in your email client like Microsoft Outlook, Windows Live Mail, Mozilla Thunderbird, etc.

POP (incoming mail) server: pop3.live.com
POP port: 995
POP SSL/TLS required: yes
POP user name: your complete email address (for example: [email protected])
POP password: your email account password
SMTP (outgoing mail) server: smtp.live.com
SMTP port: 587
SMTP SSL/TLS: yes
SMTP authentication required: yes
SMTP user name: your complete email address (for example: [email protected])
SMTP password: your email account password

Setup Outlook / Windows Live Mail on Mobile

outlook-mail-logo

On Windows Phone
On Start, flick left to the App list, tap Settings, and then tap Email & accounts.
Tap Add an account, and then tap Windows Live.
Enter your Outlook.com address.
Tap the Password box, and then enter your Outlook.com password.
Tap Sign in.

On iPhone, iPad, or iPod Touch
Tap Settings, and then tap Mail, Contacts, Calendar.
Tap Add Account in the Accounts page.
Select Hotmail.
Enter your Outlook.com address and password.
Select the fields that you want to sync. Tap Save.

On Android
You can access Outlook.com on Android phones and tablets by using the Outlook.com Android app.
Download the app

Alternatively, you can always access Outlook.com through your phone’s Internet browser at http://m.mail.live.com/

Other phones
If you have another phone that has a web browser, you can always access Outlook.com at http://m.mail.live.com/

Source: http://windows.microsoft.com/en-us/windows/outlook-to-go

Using Custom fonts in Website / Google Webfonts

How to embed custom fonts in your website?

Hey guys! Few days ago, I found this wonderful website which lets you embed custom/non-standard fonts into your website and hence make your website more professional and attractive. I found it very awesome because of its ease of use and doesn’t require almost none programming needs.

Well, I am sharing it with you all so that you also get benefited. It is really very simple, open source and 100% working

Google Webfonts Logo

Step 1. Go to Google Web fonts website https://www.google.com/webfonts

Google Webfonts Landing Page

Click ‘Start choosing fonts’ button and you are presented to the page as shown in the next image:

Google Webfonts Homepage

Step 2: Browse and select the font which you want to use in your website.

Google Webfonts Select Font

Step 3: Click ‘Quick Use’ link.

It will take you to a new page like shown below.

Google Webfonts Page Load estimation

Step 4: If there are variants of the font, it will be listed and you can select which one(s) you want to use.

Google Webfonts Choose font type

When you scroll down on the same page, you’ll see its implementation method. I recommend you to use the ‘standard’ one as it is simple and less time consuming.

Google Webfonts Implementation code

Step 5: Next you can see how to use it in your CSS.

Google Webfonts Implementation in CSS

That’s all. I hope you enjoyed this and learnt something new.

Disclaimer: Google, Google Webfonts and Related Google Logos or screenshots belong to their respective owners. We are using them for educational purpose only and not any commercial use.

Download as PDF

Consider replacing your battery fix in Windows 7

Windows 7 Laptop Battery Issue Fix

Hi everybody,

I remember 2 years ago when I started using Windows 7 beta edition. I was so happy with the new OS by Microsoft. That time also I noticed that even my new Laptop’s battery was shown faulty.

When beta edition expired and I upgraded to Windows 7 Professional, the laptop battery was still shown faulty. There was always an red cross on the battery’s icon in the system tray and on taking the mouse cursor over the battery icon, it showed a pop-up message saying “Consider replacing your battery” as shown in the image below.

Consider replacing your battery fix in Windows 7

You can read more about the same by clicking on these links below:
http://social.technet.microsoft.com/Forums/en/w7itprohardware/thread/c6c043e6-eeb1-4e61-870d-896ca2f865d6

http://support.microsoft.com/kb/2293330

I think that I installed Windows 7 Service Pack 1 from the Windows Update online. It has been a while that I had installed it. I was very astonished to see a fix for this issue last night only and I felt cherished that Microsoft took care of this. I am not sure what really helped but I install Windows Update regularly.

To fix this, simply click the battery icon in the system tray. A small pop-up window will appear right above there only. In it you can see there is an option “Warn me if my battery may need replacement” with a check box.

Consider replacing your battery fix in Windows 7

Just remove the check mark from this option. And you’ll see you no longer get this kind of distracting red X on your laptop’s battery icon.

Consider replacing your battery fix in Windows 7
I hope this might help many others so sharing with you all.
“Sharing is Caring”